Creating and configuring request types allows you to customize how requests are submitted, reviewed, and approved based on your company's requirements.
By configuring specific request types, fields, and workflows, you can collect standardized information, tailor approval workflows, and gain greater visibility and control over company spending.
Creating request types
You can create a new request type from the Payhawk Web Portal:
Go to Settings > Requests.
Under Types, click on + New.
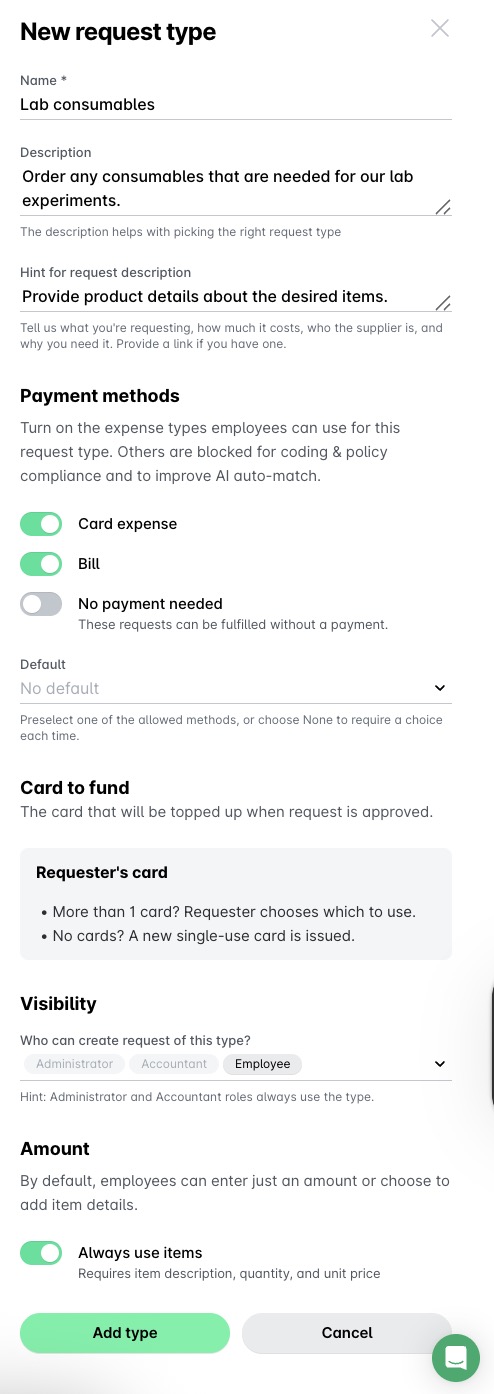
In the dialog that opens, fill in its details such as the name, description, and a hint if needed. The Name and the Payment methods fields are mandatory for the creation of the request type.
In the Payment methods field, add the payment method that will be accepted by the system for the request type.
Card expense will allow employees to select a card already issued in their name or select that a single-use card be issued in their name upon the request approval. If employees select an existing card, it will be topped up automatically with the requested amount upon approval of the request. In such cases, they’ll be able to link that request to card expenses only.
Bill will allow employees to select bank transfers as a means of payment for requests of that type. In such cases, they’ll be able to link that request to bill expenses only.
No payment needed will allow employees to select this option as a payment method for requests when the requested goods are already purchased or available on premise.
If you have selected two or more payment methods, the filed indicating the default payment method will be loaded. By default, the payment method for requests is set to Card expense. However, you can set it to any of the other defined payment methods or to None.
In the Visibility field, select the roles that can submit requests of this type. By default, Payhawk Administrators and Accountants are included and cannot be changed.
In the Amount field, turn on the toggle if you want requests of that request type to display the full items’s breakdown fields by default. This means that requesters will view the item mode of the request and will need to provide detailed information for each request’s items, including quantity, price, and total. This setting is applied automatically if the Receive step in the request type workflow is turned on.
Click on Add type.
Configuring the built-in request fields
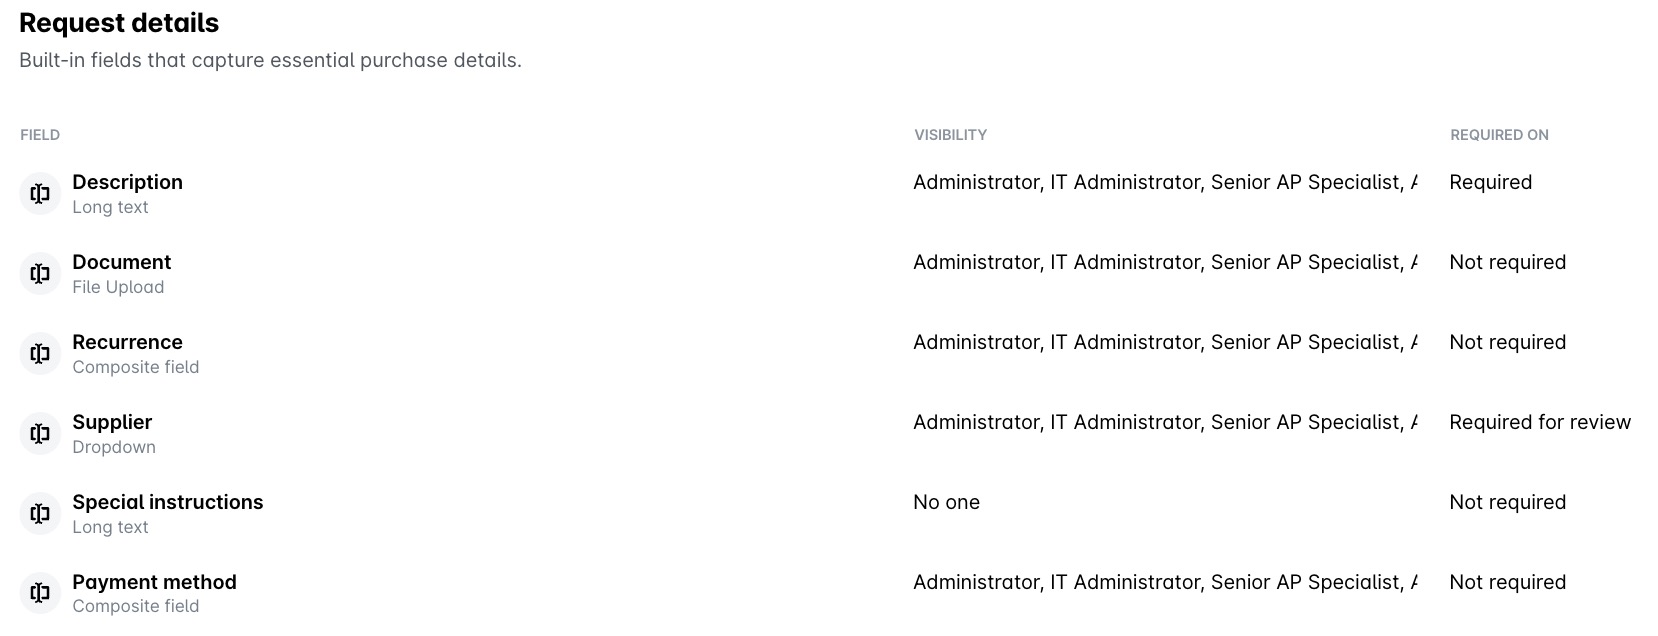
The default fields of a request type provide a different level of customisation for you depending on their function. For example, the description of the request is the only mandatory field for all requesters to fill in in order to create a request, and therefore, it’s not modifiable:
Description - Requesters will have to provide a reason or description for the request. As the system relies on the description to create the request, this field is mandatory for requesters and cannot be modified. If there are roles that will not be able to view the request field, they’ll also be listed for you to see.
Document - You can set whether the upload of a document related to the request will be required for submission or review. The other fields, such as the Enable/Disable toggle and Visibility settings, are not modifiable.
Recurrence, Supplier, and Special instructions
You can enable and disable the options for employees to define whether what they require will occur periodically or is one-time, to fill in the supplier for the request, and to enter any instructions for the supplier, such as delivery details or packaging requirements as special instructions.
You can edit the visibility settings of the request fields and define which roles can see each; Payhawk Accountants and Administrators at your company are included by default and will always have visibility over these fields. If there are roles that will not be able to view the request field, they’ll also be listed for you to see.
You can also define whether the data in these fields will be required for submission (the requester will need to enter the data in the field) or for review (the reviewer will be required to enter the data in the field).
Recurrence cannot be set as required.
Payment method
Here you can view which expense types are allowed for your employees to select when creating a request of that type, such as bill, card, or no payment, as well as whether they’ll be allowed to request a single-use card specifically for the request or they’ll need to use the cards already assigned to them. However, these settings can be modified from the Workflows app. If desired, click on Go to workflow.
You can enable the option for employees to see this field when creating requests of this type.
You can edit the visibility settings of the request field and define which roles can see it; Payhawk Accountants and Administrators at your company are included by default and will always have visibility over the field. If there are roles that will not be able to view the request field, they’ll also be listed for you to see.
You can also define whether the data in this field will be required for submission (the requester will need to enter the data in the field) or for review (the reviewer will be required to enter the data in the field).
To set up any of the default request type fields:
Navigate to the request type from Settings > Requests > Types.
Select the desired field of that request type.
Modify the desired options.
Click on Save.
Configuring the custom request fields
To define the fields that will collect any additional information about the request:
Navigate to the request type.
Go to Fields > Additional information and click on Add field.
Choose the way you want the requester to provide the data by selecting the form in which employees will provide the required data.

For example, to allow requesters to choose from a pre-defined set of values, select Dropdown.

In the dialog that opens, provide the name and a short description of the field, define its visibility and other required options, and click on Save when ready.
To disable any of the custom request fields, click on its three-dot menu and select Disable. To enable it back, do the same and click on Enable. To delete a custom request field, click on its three-dot menu and select Delete.
Associating categorization expense fields with requests
You can associate any of the custom expense fields defined for your company with the request type from the Categorization section of the request type settings:
Navigate to the request type.
In Categorization, click on the Add field button.
In the dialog that opens, select the custom field from the library. If you want to define a new one, you can click on Go to Fields Library.
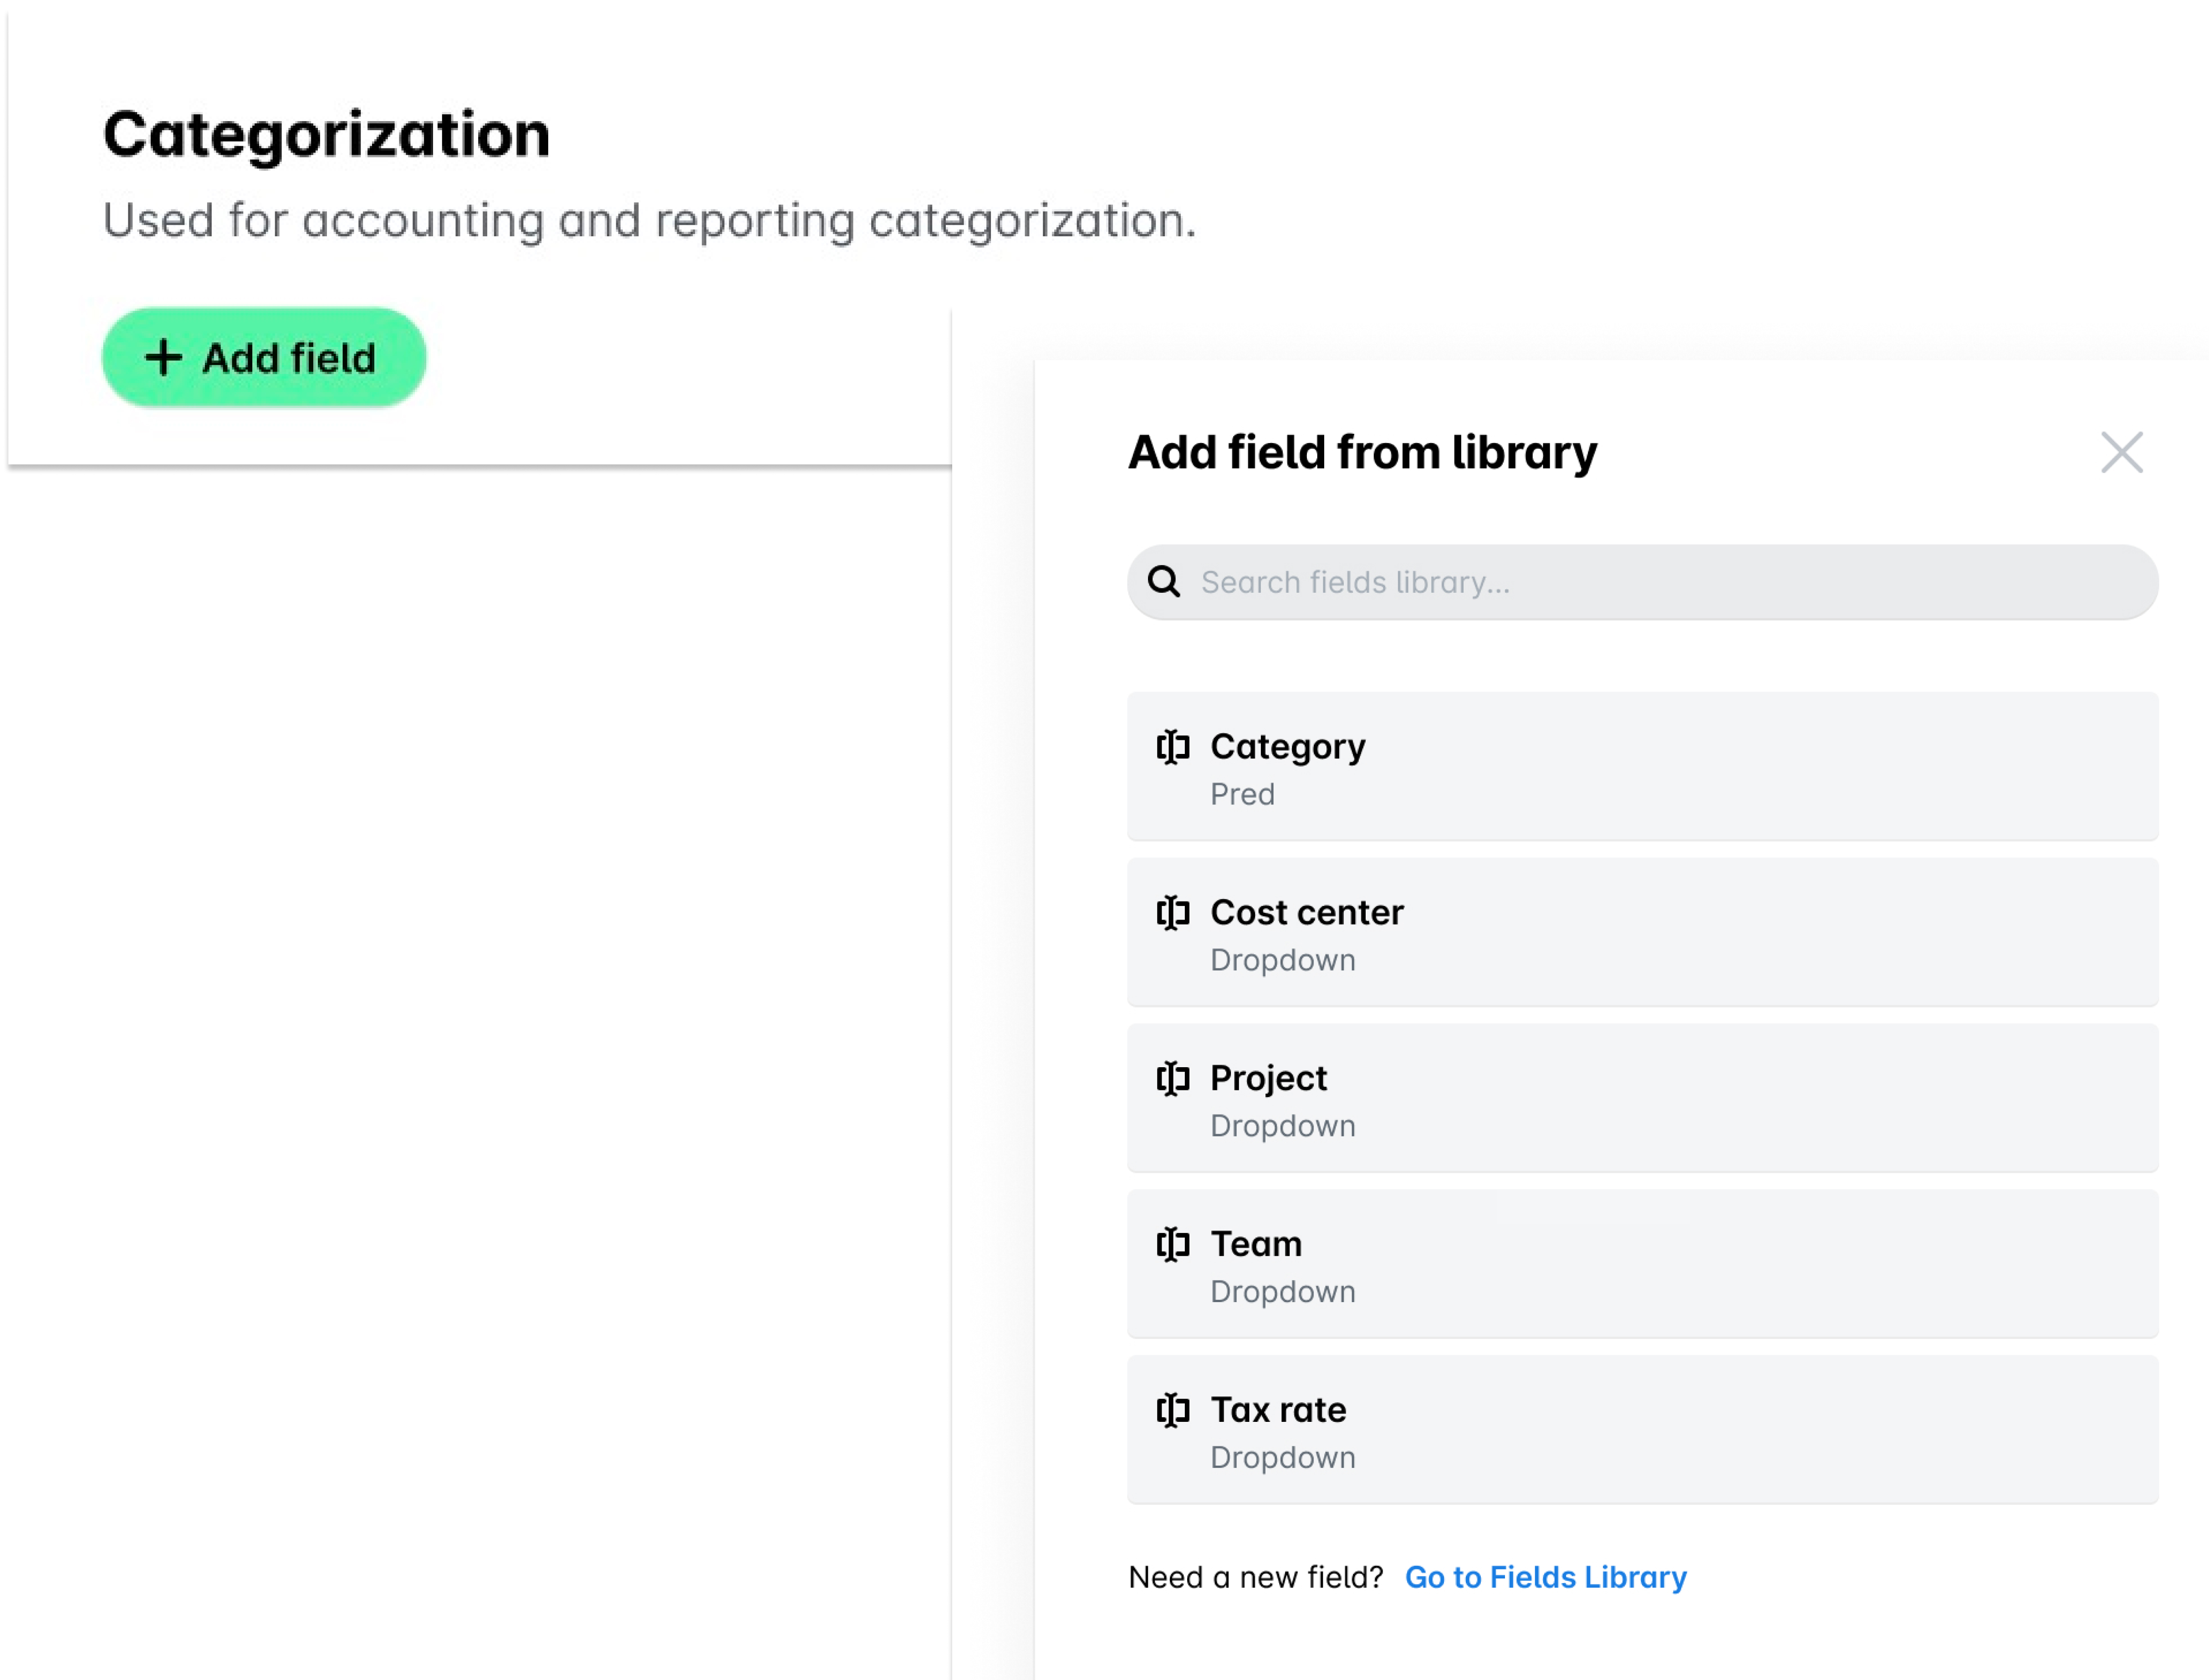
If you no longer need a field to be associated with that request type, remove it by clicking on its three-dot menu and selecting Remove field.
Any updates made to system-defined custom field settings within a specific request type will apply only to requests of that type. These local changes will not impact the global settings of the custom field across the system.
Enabling, disabling, and deleting request types
You can’t enable, disable or delete request types inherited from a group. These request types are managed at the group level and can’t be modified directly within the entity.
Once created, request types are disabled by default.
To enable a request type, go to Settings > Requests > Types > DISABLED, hover over the desired request type, click on its three-dot menu, and select Enable. To disable the request type, select the Disable option from its three-dot menu.
To delete a request type, click on its three-dot menu and select the Delete option. In the dialog that opens, confirm the action. In this way, you can delete any request type regardless if it’s enabled or disabled.
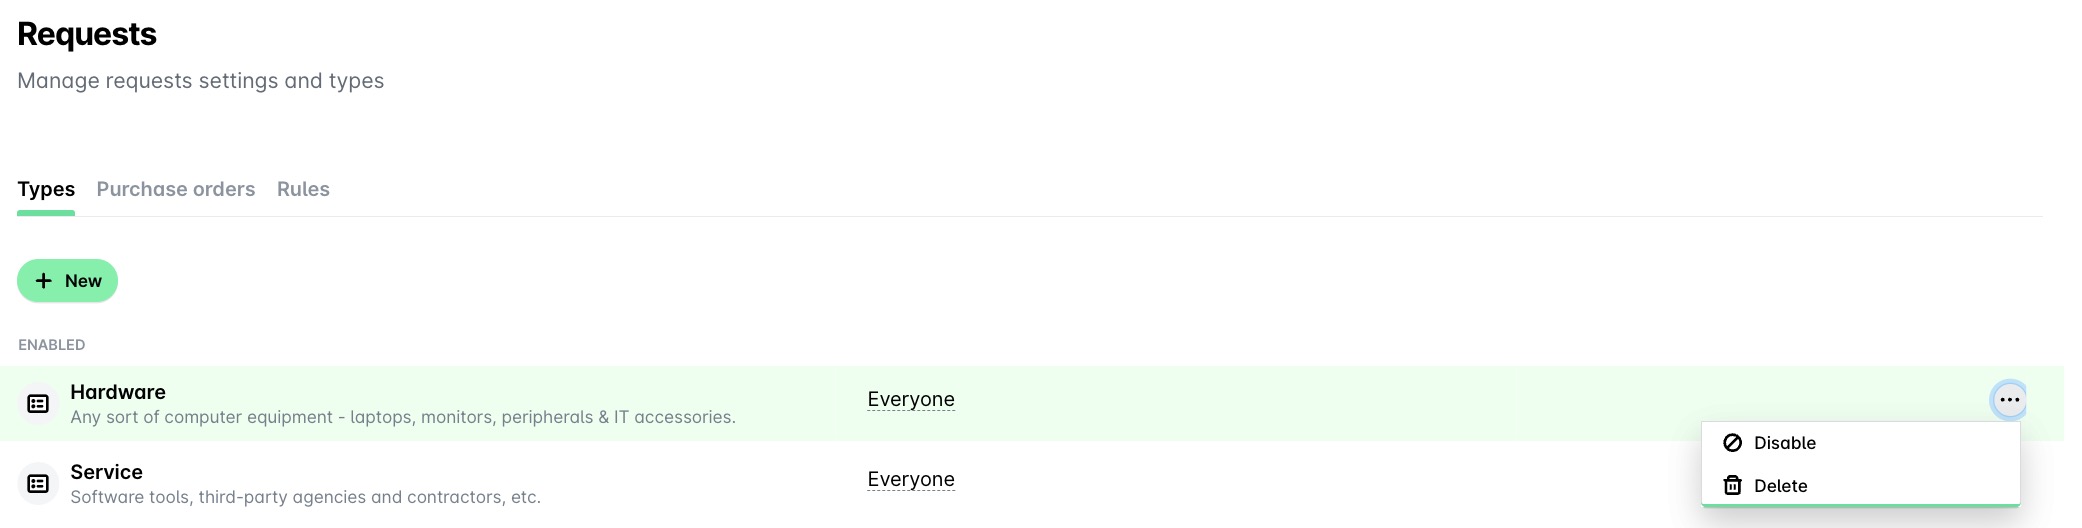
Request types are marked with a badge indicating their statuses, for example, if the request type is enabled (active) as shown in the following image.