When you connect third-party applications or automated workflows to an SAP S/4HANA® Cloud, Private Edition environment, creating the technical user and setting up the right security permissions is a critical first step. To let an external application access your data safely, you must configure a dedicated security role that grants access to specific APIs.
Phase 1: Creating the technical user (transaction SU01)
Before you configure permissions, create a dedicated user account that the external application uses to authenticate. In SAP, integrations must always use a technical user (either a System or Communication user type) rather than a dialog user.
Launch transaction
SU01in your SAP system.Enter a clear technical name for your integration user (for example,
INT_FIN_API) and click the Create icon (the blank page button).On the Address tab, fill in the required fields (Last name and Description) to indicate what this user connects to.
Switch to the Logon Data tab and maintain the following critical settings:
User Type: Dialog.
Password: assign a secure, complex password.
Setting the type to System or Communication ensures the account cannot be used by a person to log into the SAP GUI interactively. It also exempts the password from standard user expiration policies, preventing your live production integration from breaking due to a forced password reset cycle.
Phase 2: Creating the technical role (transaction PFCG)
With the user account ready, create a custom security container (a single role) to hold the API technical services and data restrictions.
Launch transaction
PFCG.Enter a unique role name in the Role field using your company's naming convention (for example,
Z_FI_API_INTEGRATION_GATEWAY).Click the Single Role button to initialize the creation process.
In the Description field, write a brief summary of what this role does (for example, Contains OData V2/V4 authorizations for financial and master data API access).
Click Save.
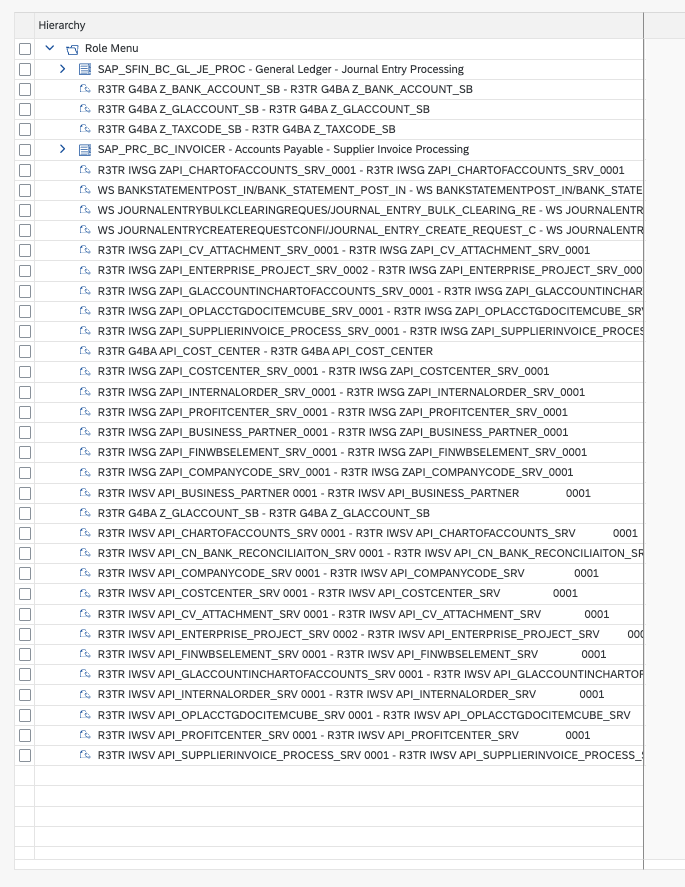
Once saved, the Menu, Authorizations, and User tabs unlock, so you can attach the specific APIs from the inventory list.
Phase 3: Setting up the technical role (transaction PFCG)
Understanding SAP API types
SAP uses a few different frameworks to handle data, and they are authorized slightly differently in the system backend:
Standard OData V2 services (
IWSV): the traditional framework for SAP APIs. Each service is added to a security role individually.OData V2 service groups (
IWSG): a modern way to bundle multiple V2 APIs together. This allows for easier routing and centralized management.OData V4 services (
G4BA): next-generation, high-performance APIs. These use a newer authorization model inside SAP's security engine.SOAP web services (
WS): operations typically used for transactional or bulk data processing, such as posting financial documents or processing bank statements. These are added through the legacy web service architecture.SAP Fiori Launchpad Catalogs: Structural containers that bundle business applications. Even for certain purely technical integration users, assigning specific catalogs is required to pass underlying application-level context and processing checks.
Master API authorization list
Below is the full inventory of services required for a comprehensive financial and master data integration role. When adding these to SAP transaction PFCG, select the correct component type.
Technical service name | Type | Selection in SAP role menu |
|---|---|---|
| Service Group ( | SAP Gateway: Service Groups Metadata |
| Service Group ( | SAP Gateway: Service Groups Metadata |
| Service Group ( | SAP Gateway: Service Groups Metadata |
| Service Group ( | SAP Gateway: Service Groups Metadata |
| Service Group ( | SAP Gateway: Service Groups Metadata |
| Service Group ( | SAP Gateway: Service Groups Metadata |
| Service Group ( | SAP Gateway: Service Groups Metadata |
| Service Group ( | SAP Gateway: Service Groups Metadata |
| Service Group ( | SAP Gateway: Service Groups Metadata |
| Service Group ( | SAP Gateway: Service Groups Metadata |
| Service Group ( | SAP Gateway: Service Groups Metadata |
| Service Group ( | SAP Gateway: Service Groups Metadata |
| OData V4 ( | SAP Gateway OData V4 Backend Service Group & Assignments |
| OData V4 ( | SAP Gateway OData V4 Backend Service Group & Assignments |
| OData V4 ( | SAP Gateway OData V4 Backend Service Group & Assignments |
| OData V4 ( | SAP Gateway OData V4 Backend Service Group & Assignments |
| OData V2 ( | SAP Gateway Business Suite Enablement - Service |
| OData V2 ( | SAP Gateway Business Suite Enablement - Service |
| OData V2 ( | SAP Gateway Business Suite Enablement - Service |
| OData V2 ( | SAP Gateway Business Suite Enablement - Service |
| OData V2 ( | SAP Gateway Business Suite Enablement - Service |
| OData V2 ( | SAP Gateway Business Suite Enablement - Service |
| OData V2 ( | SAP Gateway Business Suite Enablement - Service |
| OData V2 ( | SAP Gateway Business Suite Enablement - Service |
| OData V2 ( | SAP Gateway Business Suite Enablement - Service |
| OData V2 ( | SAP Gateway Business Suite Enablement - Service |
| OData V2 ( | SAP Gateway Business Suite Enablement - Service |
| OData V2 ( | SAP Gateway Business Suite Enablement - Service |
| OData V2 ( | SAP Gateway Business Suite Enablement - Service |
| SOAP Web Service ( | WebService |
| SOAP Web Service ( | WebService |
| SOAP Web Service ( | WebService |
| Fiori Launchpad Catalog | SAP Fiori Launchpad > Launchpad Catalog |
| Fiori Launchpad Catalog | SAP Fiori Launchpag > Launchpad Catalog |
Step-by-step setup guide
Step 1: Add the services to the role menu
Open transaction
PFCG, type in your custom role name, and click Change.Go to the Menu tab.
Click the drop-down arrow next to the Transaction button and choose Authorization Default.
Use the table above to match each service with its correct category type, search for the service name, and click Copy to add it to your role menu tree.
Add the Launchpad Dialog/Catalog: Click the dropdown arrow next to the Transaction button again, but this time select SAP Fiori Launchpad > Launchpad Catalog.
Ensure the Catalog Provider is set to Fiori Launchpad Catalog.
Enter the catalog ID in the Catalog ID field and confirm.
Always add services through this Menu tab rather than typing objects manually into the authorizations. Doing this forces SAP to automatically pull in all the technical data structures required behind the scenes.
Step 2: Grant business data authorizations
Once the services are in the menu, define exactly what data the API can interact with (for example, which specific company codes or controlling areas).
Move to the Authorizations tab and click Change Authorization Data (the pencil icon).
Click the Organizational Levels button at the top of the screen. Enter your company's target values (such as company code
1010, or a wildcard if granting access to all data fields).Expand any remaining folders marked with a red status light. Ensure fields like
ACTVT(Activity) are maintained:Select
03(Display) for read-only integrations.Select
01(Create) and02(Change) if the interface needs to push or modify data.
Step 3: Generate the security profile
The services and permissions do not take effect until a runtime profile is generated.
Once all status lights in your authorization tree turn green or yellow, look at the top toolbar.
Click the Generate button (the red-and-white circle icon).
This compiles the role configuration into active system rules.
Step 4: Perform a user role comparison
The final step ensures your newly updated security rules are safely pushed out to your integration user account.
Go back to the main
PFCGscreen and switch to the User tab.Ensure your communication or system user is added to the user list.
If the User Comparison status light is yellow or red, click the User Comparison button directly above the grid.
Select Full Comparison from the popup dialog.
Once the status indicator turns green, the configuration is live, and your application can now call the APIs.