Welcome to Payhawk!
We are super excited to have you on board and hope to make your life easier with our platform!
The Payhawk Customer Success Team is available to guide you through the entire process and you can also find them in the live chat every Monday-Friday from 08:00-18:00 CET for proactive support.
If you need to check some of the most common questions, search through the resources on the Payhawk help center.
Audience
This guide is for US-based employees who use their corporate cards to pay for company expenses. It explains how to register and activate your Payhawk account, link your corporate card, and start using it for business purchases.
You’ll also learn how to create and submit expenses, as well as approve or decline expense requests from teammates directly in the Payhawk Web Portal or Mobile App, if you’ve been assigned as an approver in an approval workflow.
Summary
This quick start will lead you through the basic steps for using the system as an employee and will help you get up and running with the Payhawk Web Portal and Mobile App.
Let's get started with your Payhawk experience!
Step 1 - Register to Payhawk with an email invite
The most common way to register your personal Payhawk account is through an email invitation a Payhawk Administrator at your company has sent you:
Go to your Inbox and open your main folder.
Open the invitation email and click on the Register button link. As a result, you will be redirected to the Payhawk Web Portal.
Create a password for your Payhawk account and re-enter it to confirm it (see password requirements). Click on Create account.
On the next screen, fill in your first name, last name, and mobile phone number, including the country code starting with a + (plus). Click on Continue. As a result, you will receive an SMS on the provided number to verify it.
In the Confirm your phone number dialog, enter the code from the SMS and click on Verify phone.

For more information:
Step 2 - Activate your account in the Mobile App
Before you can start using Payhawk, you need to download the Payhawk Mobile App and activate your Payhawk account from there.
The activation of your Payhawk account can be done only from the Payhawk Mobile App:
Open the Payhawk Mobile App and enter the email you have already registered with Payhawk. Click on Next.
Enter the password you have already created during registration. Click on Log in.
If you have Payhawk cards already assigned to you, on the next screen, you will need to create a four-digit security code, which will protect the usage of your virtual and physical cards. Remember, you must not share the security code with anyone!
You will automatically be redirected to the next screen. Re-enter the security code. You can now start using Payhawk.

You can easily update your security code by going to your profile page and clicking on the Change security code option.

For more information:
Step 3 - Link or activate your corporate card
Depending on the type of corporate card issued in your name and the corporate card program it supports, you will either need to link or activate it.
Company-issued corporate cards
If you have a Mastercard or Visa card issued in your name, you can link it directly to Payhawk once a Payhawk Administrator at your company has linked the first card of that type. After your card is linked, all transactions made with it will automatically appear in Payhawk, providing real‑time visibility of your company spending.
In the Web Portal, go to Cards > Linked cards.
Click on the New button and select Mastercard or Visa.
Then, just follow the prompts of the Mastercard or Visa payment network.
For the detailed steps on linking your corporate Mastercard or Visa cards:
American Express Cards
The Payhawk Administrators at your company can issue virtual American Express Cards from Payhawk. If you have been issued such, you will need to activate it either from the Mobile App or the Web Portal.
In the Mobile App:
Tap Cards.
Click on Activate card.
Fill in the required personal data.
Tap Save details.

In the Web Portal:
Click on Cards.
Select the card you want to activate - the virtual American Express Card that is pending activation will have the DETAILS REQUIRED tag.
Click on Add personal details.
Fill in the required personal data and click on Save details. The card tag will change to ACTIVE and you can start using it based on the spend limit and policies assigned to that card.

For more information:
Virtual Payhawk cards
The virtual Payhawk cards are delivered instantly to the cardholder's mobile phone. Your virtual card will be automatically activated once it's issued. To access your Payhawk virtual card, go to the Payhawk Mobile App and tap Cards on the bottom right-hand side.
Physical Payhawk cards
The activation of your physical Payhawk card can be done only from the Payhawk Mobile App:
Tap Cards on the right-hand side.
Enter your Payhawk Mobile App security code.
Select the card you want to activate.
Tap Activate your card, and your Payhawk physical card is now ready to use!

For more information:
Step 4 - Pay with your card
Now, let's start spending money and pay with your Payhawk cards!
Pay with your virtual card
To access your card, open the Payhawk Mobile App, tap Cards, and select the card you want to view. From there, you can see your virtual card details and use it for payments online or in-store through digital wallets like Google Pay or Apple Pay.

Pay with your physical Payhawk card
After you have activated your physical Payhawk card, you can start using it for company-related in-store purchases and pay for your travels all around the world!
You can make your first payment with your physical Payhawk card by using the contactless method if the amount is within the contactless limit set by the merchant.
If the amount is above this limit, you'll need to insert your card into the POS terminal and enter your PIN code.
Both the contactless limit and whether you need to enter your PIN depend on the merchant’s policies
To access your PIN code:
Open the Payhawk Mobile App and tap Cards.
Select the card and tap the View PIN option. The PIN will appear on the screen for five seconds.

For more information:
Step 5 - Submit your expenses in the Mobile App
From the Payhawk Mobile App you can submit card expenses and also bills, reimbursement, mileage and per diem expenses as well as company cash.
Card expenses are the expenses you paid with your physical or virtual card.
Bill payments are the expenses that are due or have been paid by your company through a bank transfer.
Reimbursements are the expenses you paid for with your private funds. For this expense type, you need to be reimbursed.
Company cash are are the company expenses you paid with cash provided by your company.
Mileage expenses are the expenses for traveling with your vehicle on a business trip.
Per diem expenses are the expenses for travel-related costs on a business trip.
Submit card expenses
Once you make a card payment, an expense will be automatically created in Expenses and you will receive a notification on your mobile phone to submit the receipt for that card expense.
In the Mobile App, go to Expenses and select the expense.
Open your phone camera and let it detect the receipt. If you have received the invoice or receipt note over email, you can also upload the image from your gallery or as a file from your local File folder.
Payhawk will automatically adjust the edges of the document, take the photo, and add the receipt to the expense.
Based on the data available in the receipt, Payhawk will extract the expense data and fill it in the fields automatically. However, you may need to fill in additional fields if required by your company or enter receipt data manually if the system hasn’t extracted it for a reason.

Submit bills, reimbursements, and company cash
You can submit any expense you need to pay or have already paid through a bank transfer, company funds, or personal funds:
In the Payhawk Mobile App, go to Expenses and tap the + (plus) icon next to your profile picture.
Select the type of expense you are uploading (Bill or Reimbursement).
Your phone camera will open, and the Payhawk optical character recognition (OCR) feature will enable the device to automatically take a photo of the invoice or receipt note.
Review the currency and amount.
Add a note of the expense (for example, dinner with a client).
Select the expense category, project, trip, or cost center (if required).
Tap Submit. As a result, your expense request is sent to the relevant approvers.

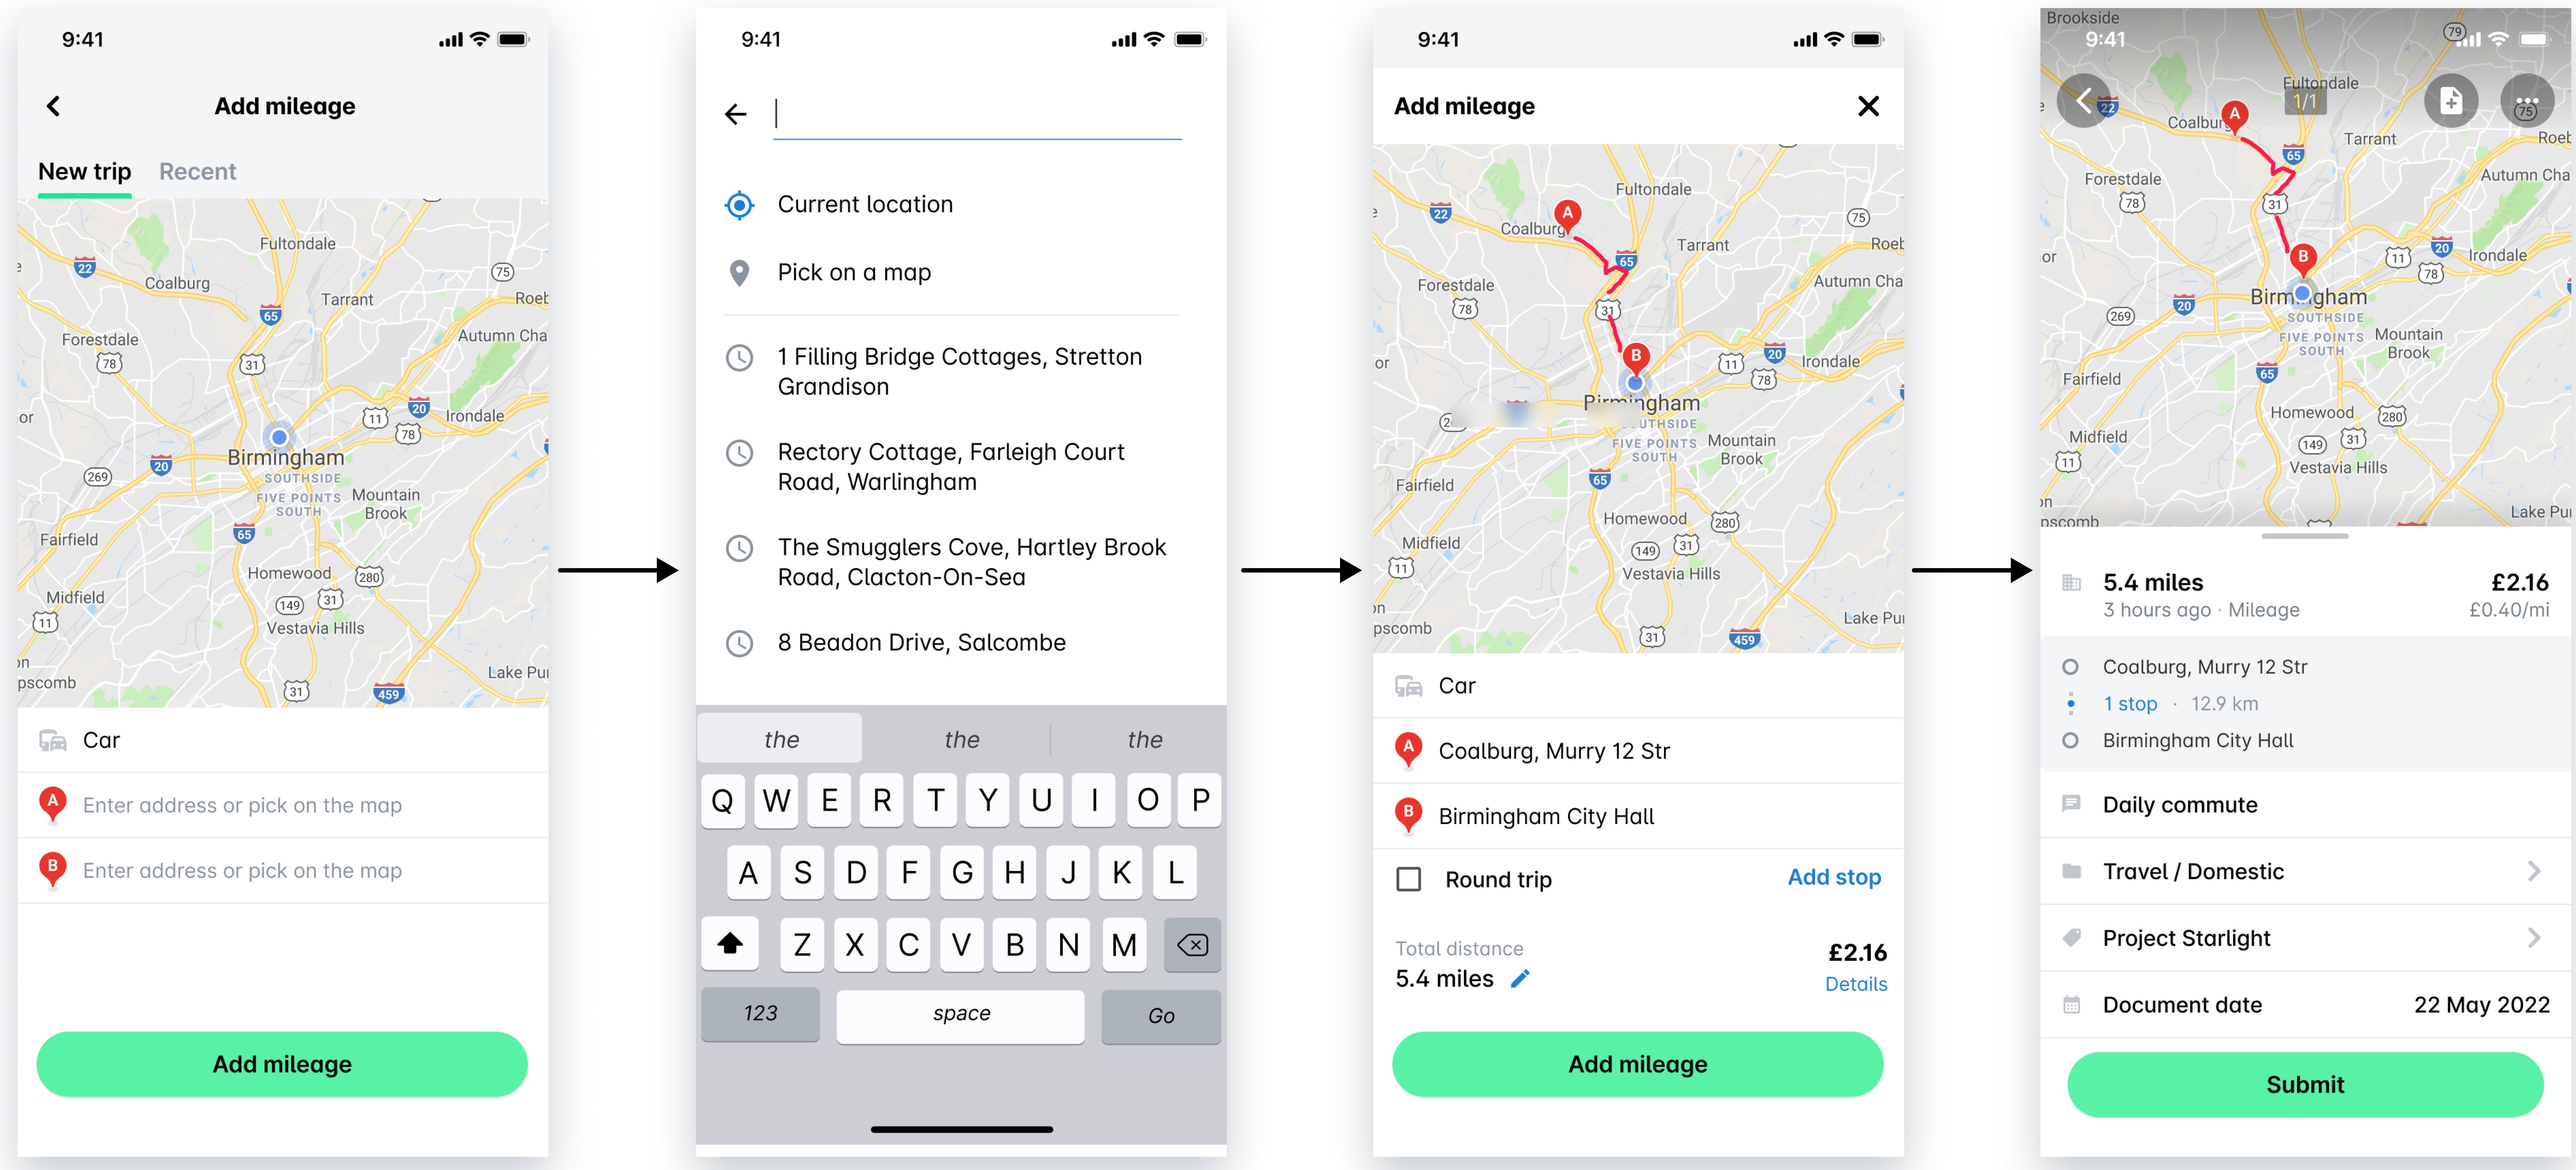
Submit mileage expenses
You can create mileage expenses and submit them to the relevant approvers:
In the Mobile App, go to Expenses and tap the + (plus) icon next to your profile picture.
Select Mileage and enter the details of your trip, including the vehicle information and the street name and number for both your origin and destination.
If you ave recently travelled, your previous trip details will be stored under the Recent tab. From there, you can replicate the details and update them as needed.
Tap Add mileage, fill in the required details, and tap Submit. As a result, an expense request will be automatically submitted to the relevant approvers at your company.
Submit per diems
You can create per diem expenses and submit them to the relevant approvers:
In the Mobile App, go to Expenses and tap the + (plus) icon next to your profile picture.
Select Per diem and enter the required trip details.
In the Deductions field, select the meals that have been included in the price, if any.
Tap Create per diem. As a result, an expense request will be automatically submitted to the relevant approvers at your company.

Step 6 - Approve and decline expense requests
If you are part of an expense approval workflow, you will be able to approve or decline (reject and delete or return to their owner) expense requests.
As an approver, you will receive a notification in your Inbox that a request is pending your approval. All requests you have to review will be under the PENDING tab. Once you approve or decline them, the requests will move to the ALL tab.
When rejecting and deleting expense requests, note the following:
When you reject and delete a request for a card expense, this will not delete the expense, but will display the reason for declining to the accountant.
When you reject and delete a request for any other expense, this will delete the expense as well.
Approve expenses in the Web Portal
To approve expense requests in the Payhawk Web Portal:
Go to your Inbox and select the desired request.
Review the expense-related information and the uploaded expense document.
If you want to proceed with approval, click on Approve. As a result, the assigned reviewers can continue with the review process.

If you want to return an expense to the employee who submitted it, click on the Decline button. In the dialog that opens, select the Return to employee option, provide the reason for your decision, and click on Return.
If you want to reject expense requests and delete unpaid expenses, click on the Decline button. In the dialog that opens, select Reject and delete, provide the reason for your decision, and click on Reject and delete.
Approve expenses in the Mobile App
To approve expense requests in the Payhawk Mobile App:
Go to your Inbox and select a request that you want to review.
Review the expense-related information and the uploaded expense document.
If you want to proceed with approval, tap Approve. As a result, the accountants can continue with their review process.

If you want to return an expense to the employee who submitted it, tap the Decline button. In the dialog that opens, select the Return to employee option, provide the reason for your decision, and tap Return.
If you want to reject expense requests and delete unpaid expenses, tap Reject and delete. On the next screen, provide the reason for your decision and tap Reject.
For more information:
Video onboarding
Steps outlined in this guide are also covered in Payhawk's dedicated onboarding video library on YouTube. The content is available only in English.