Welcome to Payhawk!
We are super excited to have you on board and hope to make your life easier with our platform!
The Payhawk Customer Success Team is available to guide you through the entire process and you can also find them in the live chat every Monday-Friday from 08:00-18:00 CET for proactive support.
If you need to check some of the most common questions, search through the resources on the Payhawk help center.
Audience
This guide is intended for employees of US-based companies who have Payhawk Administrator permissions and are responsible for fully managing their company's Payhawk account. This includes overseeing all company expenses, linking and issuing corporate cards, setting spend policies and card controls, defining workflows, processing bill payments and reimbursements, and creating teams with shared budgets.
Summary
This quick start will lead you through the basic steps for using the system as a Payhawk Administrator and will help you get up and running with the Payhawk Web Portal and Mobile App.
Depending on your use case and the relevant Payhawk services you use, you can have a different user experience with the platform.
Let's get started with your Payhawk experience!
Step 1 - Register to Payhawk and activate your account
Initial Payhawk Administrators register either through a link provided by their company's Payhawk representative or by signing up for a free trial.
To be able to follow the steps in this guide, you need to first:
For more information, see the articles about configuring your personal Payhawk profile settings.
Step 2: Define your Payhawk use case
Option 1: Your company is using Payhawk's card spend services only
If you want to use Payhawk for card transactions only, you just go ahead and link your corporate cards to Payhawk and start spending:
Link your company's existing American Express Main Cards to Payhawk. You can use them as a funding source for any virtual American Express Cards you would issue from Payhawk in the name of your employees later on. If you have American Express Additional Card Members' Cards, you can also assign them to their owners from Payhawk.
Link the first of your company's existing corporate Visa or Mastercard cards to Payhawk. Once the first of the kind corporate card has been linked by a Payhawk Administrator to Payhawk, your employees can then individually link their Visa and Mastercard cards to Payhawk.
Issue virtual or plastic credit Payhawk Visa cards in the name of your company's employees.
In this case, your next steps will be:
Option 2: The company is using Payhawk's accounts payable services only
If you have been approved to use Payhawk for bank transfers only, your must have connected a company's external bank account to Payhawk during the application process. Once the checks have been successfully completed, you can start paying bills, reimbursements, per diems, and mileage expenses through an ACH Pull and Push, meaning Payhawk will pull the exact funds from your company's connected bank account and will push them to the bank account of the merchant, or employee in the case of reimbursements. This means that the actual money will remain in your external bank account, but the authorization, monitoring, and reconciliation will be centralized in the system.
You can make US-only bank transfers in USD for bill payments and reimbursements.
In this case, your next steps will be:
Option 3: Your company is utilizing Payhawk's credit providing services only
If your company has been approved for a credit line, Payhawk will automatically create a USD currency account for your company, and the approved amount will be disbursed into it. Then, you can have your corporate cards linked to Payhawk as described in this section.
In this case, your next steps will be:
Step 3 - Link your external bank account to Payhawk
Payhawk connects to your bank using Plaid. For more information about the required steps, see Plaid's official documentation.
If Plaid doesn't support your bank or the connection fails, the Payhawk team can manually link your external bank account to the system. For the manual connection, you will need to:
Provide the required documents, namely, two recent monthly bank statements in PDF and a screenshot of your online banking portal showing today's balance, account number, and routing number.
Whitelist IDs, meaning authorize Payhawk's and your company's Originator IDs to prevent transaction interruptions.
Verify microtransactions, requiring you to confirm a small deposit and withdrawal made by Payhawk to validate the connection.
Once these steps are completed, your bank account will be successfully linked. For more information, see the help article about linking and unlinking bank accounts to Payhawk in the US.
Step 4 - Link cards to Payhawk and set their card controls
Your experience linking corporate cards to Payhawk depends on the type of cards your company uses.
American Express
You can link your American Express Main Cards to Payhawk. These will serve as the funding source for the virtual American Express Cards you can later issue directly from Payhawk. You can also assign Additional Card Members' Cards to their respective owners within Payhawk.
Mastercard
For Mastercard corporate cards, employees are encouraged to personally link the cards issued in their names. However, this is only possible after a Payhawk Administrator at your company links the first Mastercard to Payhawk, establishing the connection between the two systems.
Alternatively, you can link all your company's Mastercards to Payhawk in bulk. This is possible only if the Mastercard program your cards belong to supports bulk enrollment. To confirm eligibility, contact your bank first. If eligible, the cards will be automatically imported into your company's Payhawk account, and you'll need to manually assign them to the corresponding employees based on the last four digits visible after import.
Visa
The process for linking Visa cards is similar to Mastercard, with minor differences in the user experience specific to each payment network. A Payhawk Administrator must first link their corporate Visa card to establish the connection between the two systems. Once the setup is complete, employees can link their own corporate Visa cards issued in their names.
You can also enroll Visa cards in bulk after contacting your bank to check eligibility. If the cards are eligible, they will be automatically imported into Payhawk, and you'll need to manually assign them to their respective cardholders.
Step 5 - Invite employees and create your teams
To enable employees to start using Payhawk, you need to first invite them to the system. Then, you can build your teams. Teams in Payhawk don't have to necessarily correspond to the hierarchical structure at your company. They can also be created based on other criteria, such as specific projects or functions employees are working on.
Payhawk roles and permissions
Each employee you invite to Payhawk must be assigned a role. You can either use any of the built-in Payhawk roles or create your own custom role. Additionally, on top of each role, you can assign the role extension of the Team Manager or Executive Assistant if needed.
Payhawk Administrators can assign the Authorized Representative role to team members who need to handle compliance documentation, such as uploading identity documents, accessing KYC forms, and receiving KYC notifications, without granting them full Administrator access.
The fundamental Payhawk roles are Payhawk Administrator, Payhawk Accountant, and Payhawk Employee. The other built-in roles of the IT Administrator, Senior AP Clerk, Authorized Representative, and Auditor are based on the permissions of the Payhawk Administrator role.
Inviting employees to Payhawk
To invite employees to Payhawk and assign them the necessary roles:
Go to the Employees > Employees tab. Click on + Add new.
To send an email invite to the employees, enter an email, select the role, and click on Invite. As a result, the employee will receive an email with a registration link.

To send an SMS invite to the employees, enter an email, and switch on the Invite with SMS toggle button. Fill in the employee name and cell number, select the role, and click on Invite. As a result, the employee will receive an SMS with a registration link.

The team members you invite receive emails. Clicking on the Start using Payhawk button will lead them to the screen for creating their Payhawk account.

Once the invited employees register to Payhawk, their pending invitation status will change and the employee will move under the Employees > Active tab.
After you've invited your employees, you can build and manage your teams and employees - for example, create, edit, and delete teams, modify employee reimbursement details, or edit employee emails.
Additionally, Payhawk also supports integrations with multiple HR Information Systems (HRIS). This means that you can automatically import employees and their data from supported platforms.
Step 6 - Set approval workflows
Different departments, amounts, expense and request types may require separate approvers before an invoice or payment is finalized. Payhawk allows you to create custom approval workflows to fit your company's structure.
Conditions, approvers, and custom workflows
You can define workflows for card requests and card transactions, reimbursements (including per diem and mileage), bills, requests, purchase orders, and other expense and request types.
Approval steps can be assigned to default roles (such as Payhawk Accountant or Administrator), custom roles, or specific employees. You can also include Team Managers, Category Managers, or Custom Field Managers to handle approvals based on teams, expense categories, or values you define.
Workflows in Payhawk are highly flexible. You can build conditions, such as amount thresholds, and design sequential or parallel approval steps to match your company's policies and spending processes.
Defining workflows for bills
For this example, let's assume you haven't defined any workflows for bills (outgoing bank transfers) just yet, and that you want to create approval for bank transfers with no purchase orders:
In the Payhawk Web Portal, go to the Settings > Workflows > Expense types tab.
In the Bill field, click on Edit workflow.
Click on Submit and select the Submit On option to allow employees to submit expenses that will be paid over bank transfers.
Click on Save changes.
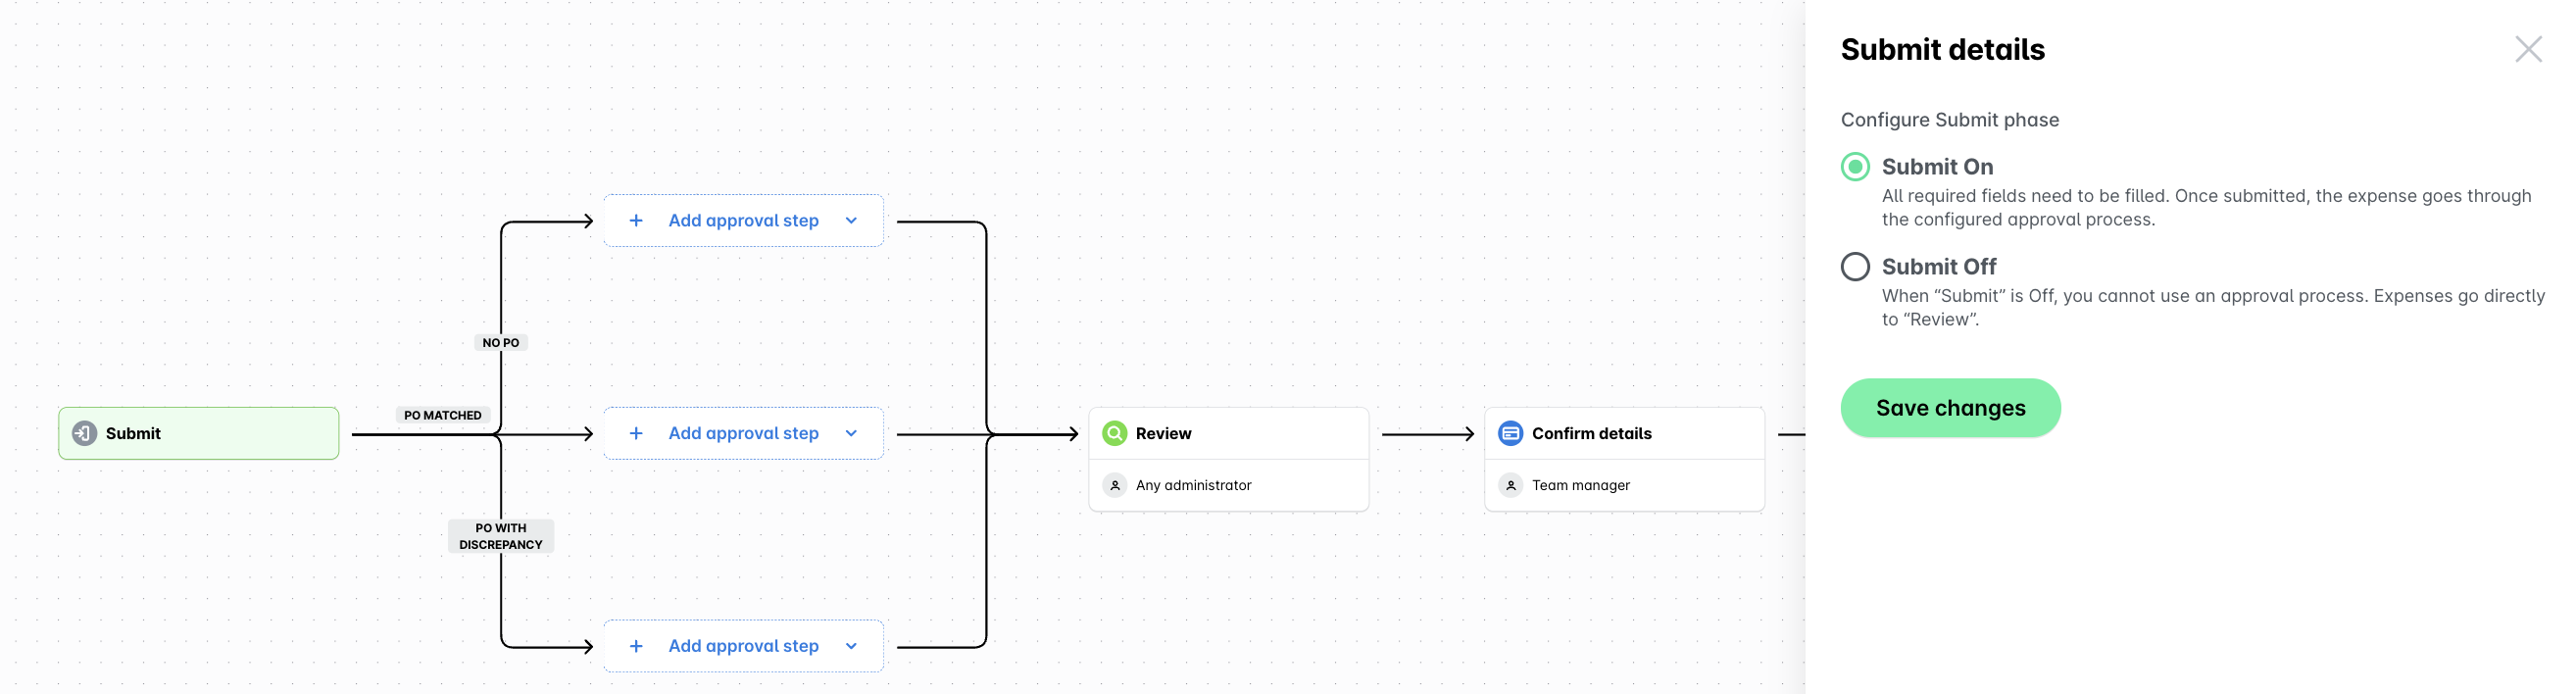
For the approval step of the bill expense type, follow the NO PO option and click on + Add approval step. Choose to add your custom approval or use the default template suggestion. For this example, click on + Custom.
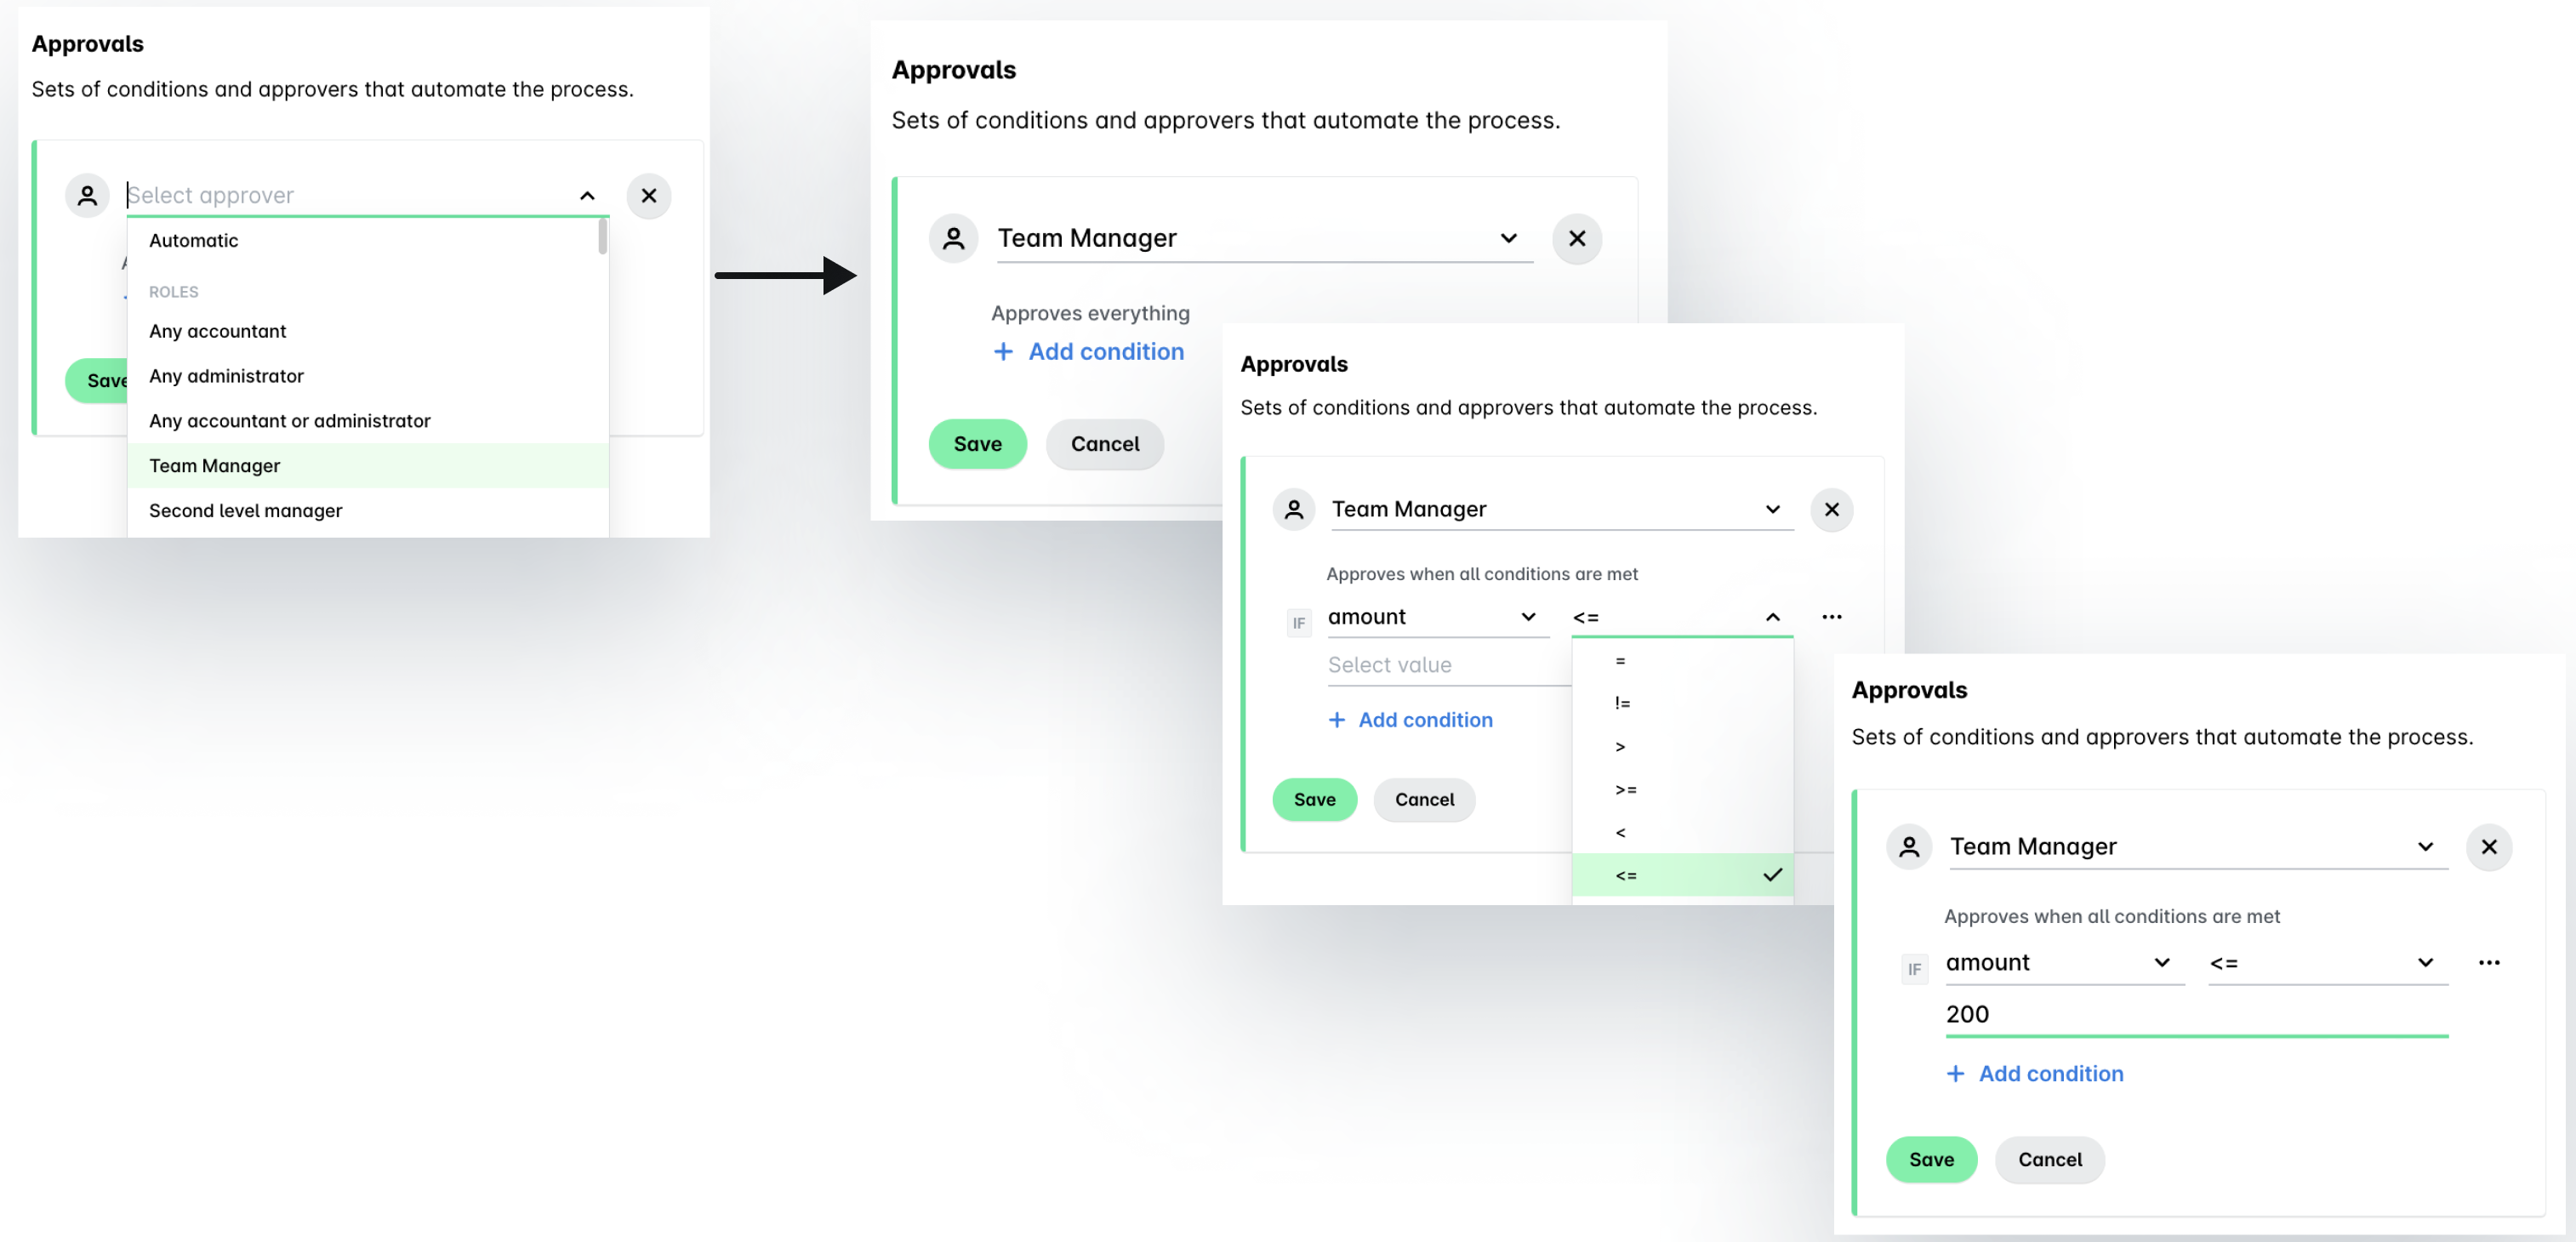
The Template option displays any previously defined custom roles for your company, for example, Team manager, so that you don't need to manually select
from the drop-down list of available approvers.
In the dialog that opens, name the step by clicking on the Pencil (edit) icon. Fill in the content and click on the ✔ button.

From the drop-down with available approvers, select the Team manager role. Then, define the desired condition by clicking on + Add condition - for example, Amount.
To specify the amount for which approval will be required, define the quantity limit from the drop-down - for example, less or equal to (<=). On the next line, set the amount - for example, 200.
Click on Save.
To define single-step, multi-step sequential, or non-sequential approvals, follow the guidelines and apply the same steps as above.
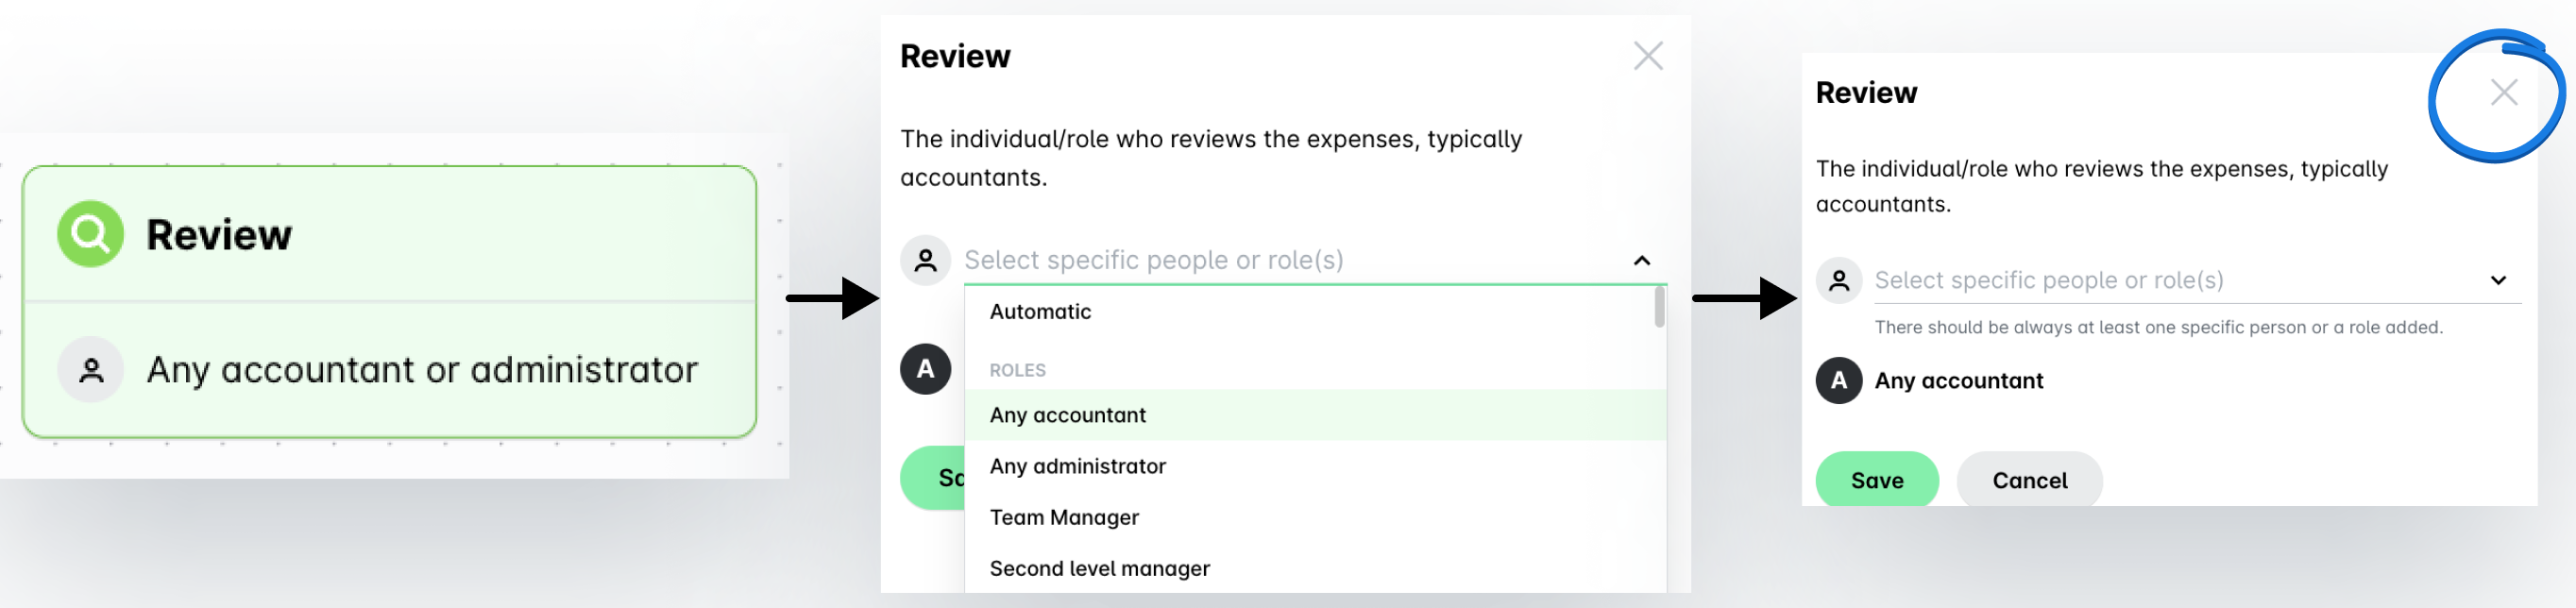
To set the rights for reviewing expenses, click on the Review step. From the Review drop-down menu, select the specific employee or role that will be allowed to review the bills at your company - for example, any Payhawk accountant. Click on Save.
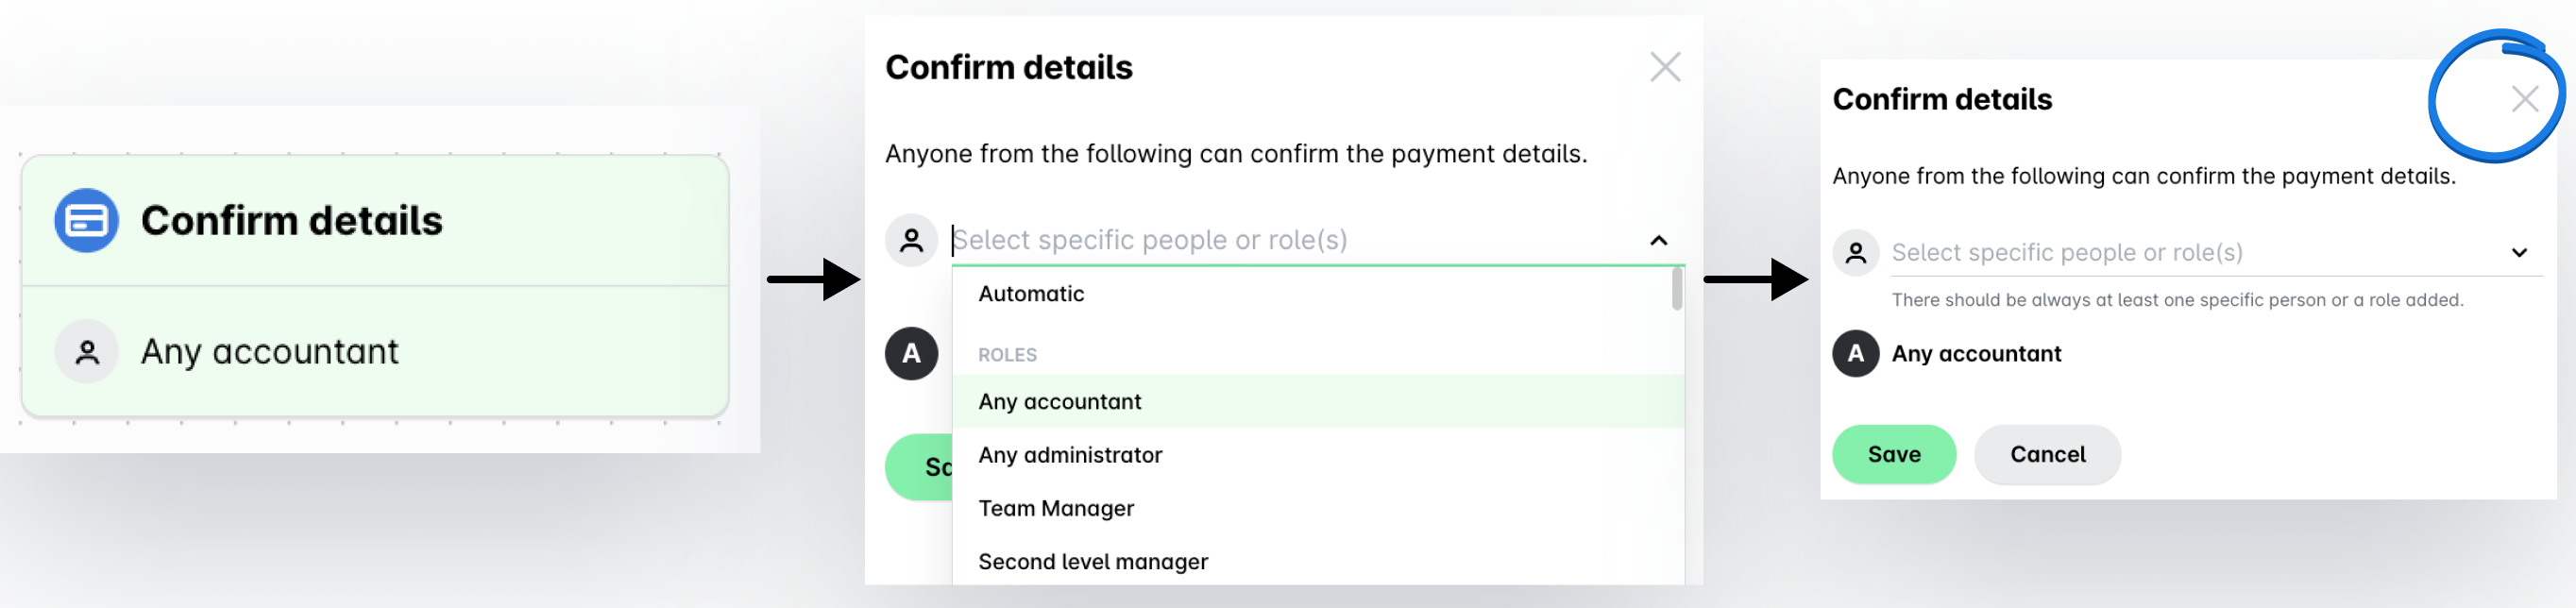
To set the rights for confirming expense details, click on the Confirm details step. From the Confirm details drop-down menu, select the specific employee or role that will be allowed to confirm the expense details and the payment execution methods at your company - for example, any Payhawk accountant. Click on Save.
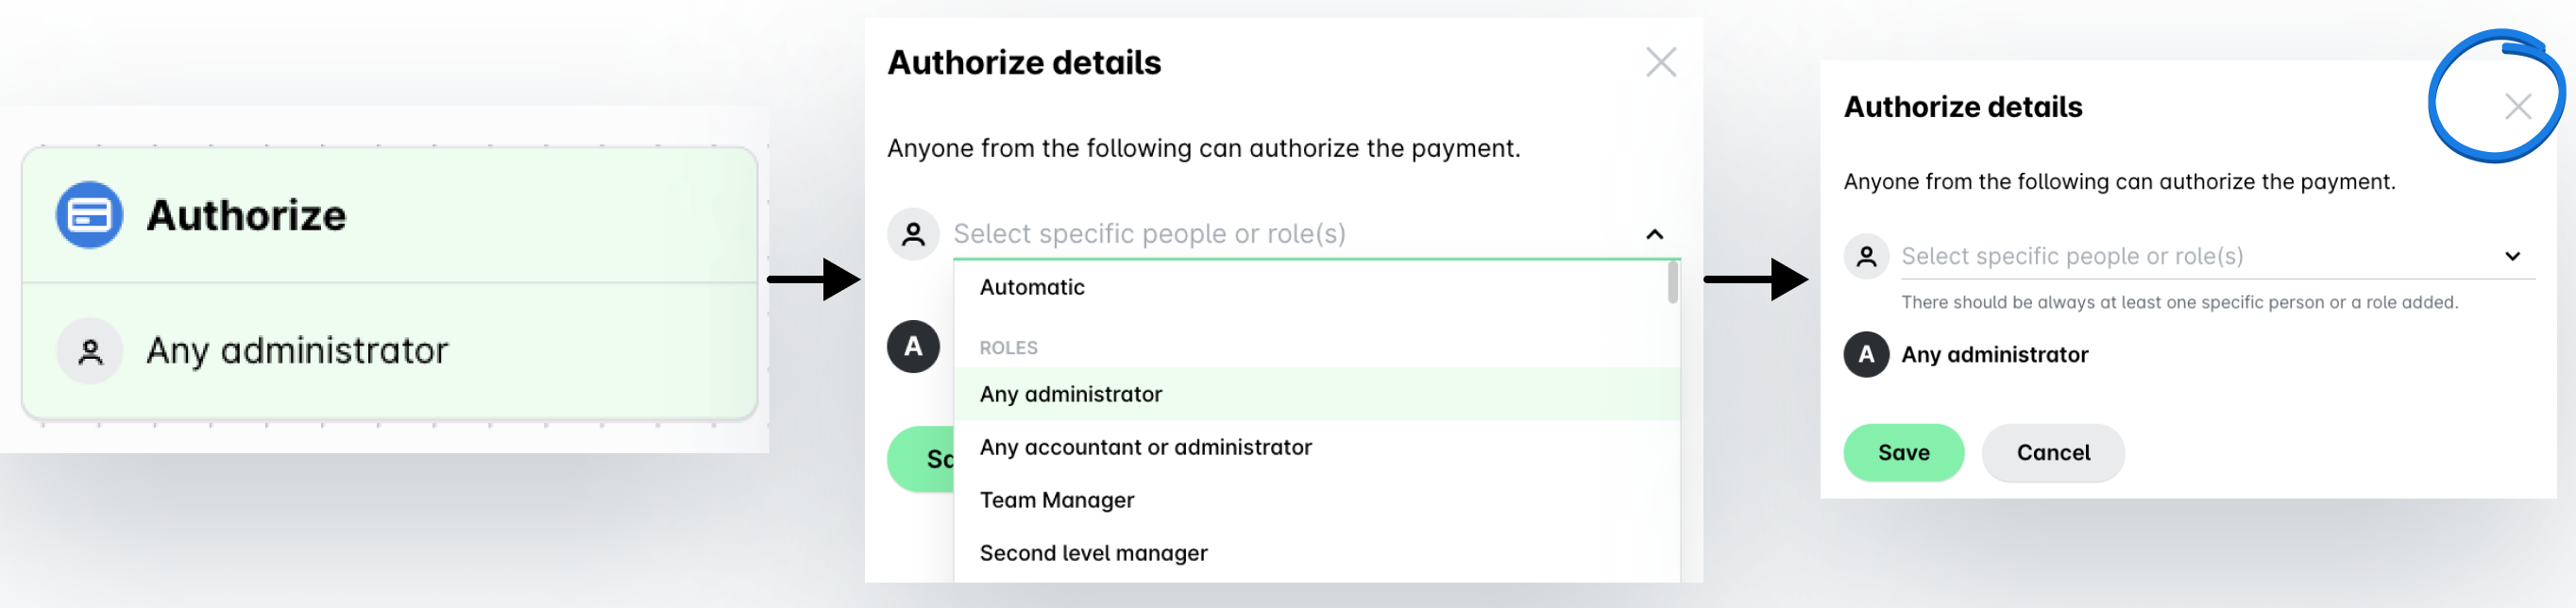
To set the rights for authorizing payments, click on the Authorize step. From the Authorize drop-down menu, select the specific employee or role that will be allowed to authorize (pay) bills for immediate or scheduled payments with no purchase orders linked to them - for example, any Payhawk administrator. Click on Save.
For more information, see how to define workflows for requests and purchase orders and card requests. After you have defined your workflows, your employees can submit expense requests, card requests, and other requests, while the approvers at your company can approve or decline them.
Step 7 - Sync your Payhawk account with your ERP
Payhawk supports live integration with ERP systems, such as DATEV (DUO), Exact Online, Sage Intacct, MS Business Central, Oracle NetSuite, Xero, and more. Based on the integration, the master and custom accounting data, specific to the ERP system, is automatically shared between Payhawk and the accounting software. For more information on what expense and payment data is pushed and pulled daily, see the articles about shared data for the integration you need - for example, shared data between Payhawk and DATEV (DUO), Exact Online, MS Business Central, Sage Intacct, Oracle NetSuite, Xero, and more.
In addition to integrations with ERP systems, Payhawk also supports connections with travel management systems such as Perk (formerly TravelPerk) and Egencia, enabling seamless business travel management.